Saturday, September 18, 2010

Saving Art

My 3-year-old daughter has repeated her personal affirmation so many times lately.  Truthfully, I don't know where she comes up with this stuff.  But, I love her motto. 

"I am going to be an artist.  If I can't be a good one, I'll be a bad one."

Up until about a week ago, all of her art looked pretty much like this.  She would present me with a drawing and proclaim, it a rocket ship, or a princess, or a garden. 

Last week she brought me this drawing and said it was an ocean full of animals. 

They actually look like something.  I guess she had a breakthrough. 

Her latest art project from her first day of preschool:

It actually inspired me to start scanning her artwork into the computer to make a photo book for her.  I am going to keep all of the projects, photographing the 3-d versions and mix in some photos from this year.  At the end of 2010 I am going spend a few hours and make a digital scrapbook on snapfish for this year. 

Happy Crafting!

Sarah

Friday, September 17, 2010

How to Clean Your Iron

The previous post reminded me of a little trick I would like to share.  If you do melt something onto your iron, like felt or plastic (which, sad to say, happens to me all of the time), you can clean it off really easily.  Turn your iron onto the highest setting and let it really heat up.  Once it is really hot, take a few sheets of dryer sheet (I keep a cheap box of dollar store dryer sheets with my iron.).  Wad the sheets up into a ball and scrub your iron with them.  Be careful not to burn yourself, obviously, but this will remove all of the junk from your iron.  It's actually a good idea to clean your iron on a regular basis. In the grand scheme of things, not much can go wrong with your iron.  Make sure to use distilled water in the steam chamber and keep the plate clean and it should last a very long time. 

Free Tutorial Fridays - No Sew Pumpkin Halloween Costume

As promised, I am going to give you the tutorial to make this great Halloween costume.  A little background:

I made this entire costume for less than $5.00 (actually it was $1.00 plus some stuff I had in the craft room).  This costume would be totally cute for an adult, especially as a maternity costume or just to wear to your child's class part of for passing out candy.  You can get everything to make the pumpkin and hat at the dollar store.  My dollar store always has t-shirts and I lucked out this time they were actually from the Disney Store.  If you cannot get a shirt at the dollar store, check Michael's and Joann's.  They almost always have craft shirts on sale 2 for $5.  You could also make this long sleeve.  I was thinking of layering it over a green sweatsuit.  If you bought a man sized shirt you could even make this into a little pumpkin dress for an adult.  You can make this entire shirt and hat no-sew with hot glue, fabric glue, or fusible web.  One note, if you use craft fuse, felt will melt onto your iron.  Use a sheet of white paper as a "pressing cloth".    


See Pumpkin Halloween Costume No Sew Simple and 1000's of others - or share your own on Cut Out + Keep

I posted it on one of my new favorite sites www.cutoutandkeep.net.  Click the link above to get my step-by-step tutorial and you can make this costume in under 20 minutes. 

Happy Sewing!

Thursday, September 16, 2010

Free Fabric Flower Tutorial, Tips, and Tricks

I just thought that I would share this super easy craft Lisa and I make for our shows.  If you do shows, you need to have some smaller, lower priced item that people can pick up as little gifts or stocking stuffers.  You could make these patriotic, Halloween, Christmas, Easter, etc.  This would also make a really great birthday party favor.


I read online that you could cut felt with the cricut if you fused down stabilizer to the back.  Maybe you can with the Expression, but I only have the little Cricut Personal.  It was really a disaster.  It didn't work and I wasted $30.00 on the deep blade housing. 
Plus, I had a couple of yards of felt with fusible stabilizer on the back.  So, instead of giving up hope, I decided to try by die cutter.  Guess what?  It works like a charm. 

I used the Sizzix "Flower Layers 3" Die found here  (I actually buy them in Michael's or Joanns with a coupon). 

I also used the original "Flower Layers" shown below.  I was just on the Sizzix website and they have about 50 different flower dies to choose from.  There are a couple that look like poinsettias which would be so pretty for Christmas.
I don't actually have the Sizzix machine.  I have the small Cricut Die Cutter.  The Sizzix dies work in it. 

I just cut the felt down into 4"x6" pieces. 

Then I placed 2 layers of felt over the die and cranked it through the machine.

You do not need to put stabilizer.  You can use regular or stiffened felt. 

Then, I layered up the flowers in random order.  For the centers, I used a pompom.  You can get a bag of these at most Dollar Stores.  I stitched right through the pompom, wrapped the thread around the pony tail holder (also from the Dollar Store) and then come out the top of the pompom.  Then I tied the thread and left it sticking out. 

I used that string thread that you use for fillet crochet and a big upholstery needle.

These little flowers are about $.05-$.10 a piece to make. 

You could also attach these flowers to pins, hats, headbands, alligator clips, etc. 

Idea 2

Another great project Lisa and I did with felt and die cuts is to make felt dress up dolls for a felt board.  If you have never seen a felt board, the name basically implies what it is.  It is some felt glued onto a board.  The easiest way to make one if to take a piece of foam core board and spray glue down a large piece of felt to cover the board or the glue a piece of felt onto one of those little cork boards you get at the dollar store. 

Anyway little kids love these boards because the pieces of felt stick together and they can make pictures and tell stories. 


In addition to cutting out the basic shapes with my shapes dies, we also used the "Dress Ups" line to cute out people.  The body actually makes a boy or a girl depending on what hair you cut out.  They also have clothing dies.  This ended up being a very fun project and it only took a few minutes.  With my daughter in preschool, I will probably be using this project idea to make b-day gifts in a very affordable way. 

The Sizzix dies also come in animals, letter, and pretty much anything else you can imagine. 

Craft Roundup - Recycled Record Projects

I was inspired by posting my recycled record project to create this little roundup of recycled record tutorials. 


This photo frame is such a wonderful project.  With everything I have made out of old records, a picture frame never occurred to me.  Click here for the free tutorial on recycled record photo frame from Inspirational Tips, Techniques, and Tutorials.


This project is so simple with the use of the ring to bind everything together.  This idea would be really fun shrunk down to a small, 3"x5" size for a purse notepad. 
Here is the Tata et Moi 
from Cut Out and Keep's


I have already made 4 or 5 record clocks.  I just bought the clock kit and used the clock.  But, I liked they way she covered this with fabric.  You could make this for a child's room, kitchen, etc.

From Sew Many Ways

I know lots of people make purses from the records.  I have made a few, but I will say that the records always end up breaking.  I must just be way to hard on purses. 

Have fun with your old records and

HAPPY CRAFTING!


A Fun Little Recycling Project for Old Records

Somehow, I managed to acquire about 200 old records that were warped in a fire, but still in good condition for crafting.  So, I started using them up making all sorts of crafts: records purses, bowls, bracelets, necklaces, etc.

But, then I had all of the covers left over.  I saw an idea for making a tote bag with the covers.  I tried a few versions, but I wasn't really into it. 

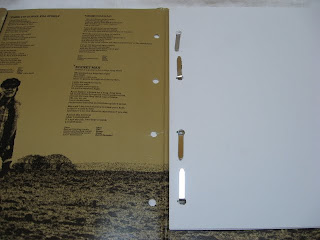
So, I came up with another idea.  I used my 2 hole punch  to make a songbook/notebook/sketch book out of the records.  On the right of the paper, because of the big space that is left over, I stitched down a strip of elastic to hold pens/charcoals, etc. 

I did another version where I punched through the side multiple time and laced it up with ribbon. 

Just thought I would share this little idea.  I know it isn't really my normal sewing patterns and tutorials, but like any true crafter, I cannot be pinned down to just one medium.

Tuesday, September 14, 2010

Some Crafty Ideas for Halloween

I took my baby bootie pattern and made some Halloween themed booties.  I have to say, I really love this pattern.  You can literally make almost any image on the top of the shoes and it is just so simple.  I also used up some of my stash of corker ribbon on the bottom of the pumpkin shoe.  I think that I might make a few pairs with nothing but big sprays of corker ribbon as a decoration. 

I actually just had a great idea for these shoes.  If you made the pattern in a solid color you could just change out the decoration daily by getting those embellished pony tail holders from the Dollar Store or Target.  Then you can just slip they pony holder onto the shoe and you would be able to have little shoes that matched every outfit. 

1st Day of School

This isn't specifically about crafting, but it continues on in the theme of back to school week.  Today was my daughter's first day of preschool.  She was so excited due to 2 weeks of pumping her up everyday and some sweet phone calls this morning from her aunt and uncle. 

I did manage to get it together enough to make this sweet little backpack (which looks like Eyore but is really a purple pony) and a little boutique hair bow to match her outfit. 

Lisa and I will be putting together the pattern for the backpacks (a bit late, I know) and some tutorials on the hair bows.  Every single girl in her class had one in her hair. 

Monday, September 13, 2010

Old Pattern New Booties

So, the giant cupcake tower of booties just wasn't enough for me.  I finally got around to taking this $2.00 vintage find and making a pattern from it.  A few months ago, I found a half finished pair of kitty slippers at a little antique store in the bargain cabinet.  The pins were so old that they were stuck in the slippers from all of the rust.  But, I persevered and ripped the old straight pins out (I probably need a tetanus shot now) with a pair of pliers. 

They were huge.  Probably a child's size 4-5.  So, with a few tries, I changed the patterns to a few different, smaller sizes.  I have to admit, I was actually dreaming about all of the possibilities with this pattern: animals, people, robots, personalized, buttons, etc.  I made 10 pairs so far today. 

This pattern is deceptively simple.  What I love about it is that there is no chances of missing something when you are sewing.  I cannot tell you how many pairs of baby booties I have thrown out or seam ripped apart because of missing a small spot when sewing.  I don't really like getting the top to match up with the bottom and sewing in a circle isn't all that easy.  These have 2 straight seams.  You can top stitch the entire pattern, no turning.  Awesome!

Elephants were my first try, mostly due to the 2 yards of grey fleece I have lying around.  This is actually pair 2.  Pair 1 looked more like mice.  I'm just going to cut the trunk off and put on some whiskers.  Then they will be mice.  That would be so cute with a little Cinderella inspired night gown. 


I made this set with a butterfly and a flower.  I only made these single thickness because I thought that Kamille would love them for dress up with one of her fairy costumes.  


I also made monkeys.  I wanted to show a girl and boy version.  I really love to add a little extra touch on all of my girl things.  I had these weird zebra print flowers lying around and they really went well. 


Then, I wanted to see if I could use something other than fleece or felt.  Yes, this pattern is great if you fuse regular fabric onto felt and then top stitch together.  I came up with these really adorable 1st birthday shoes.  I haven't finished with this yet.  I'm thinking monograms and maybe mommy & daddy's pics for really little babies. 


My finale were these totally adorable pixie toes.  I sewed a ribbon for the bow right into the seam in the back.  Sew simple :).

Next stop----Halloween!

Sunday, September 12, 2010

Creative Photo Display For Our Crafts

I have to admit that I am a little jealous when I see some of the really beautiful photos that other artists have of their wares.  I try to make everything look nice, but photography isn't my strong suit.  Plus, in Michigan we cannot take outside photos as often as other people.  Half of the time it's raining or snowing. 

I decided to give creating a more artful display a try for my new baby booty pattern. 

I have to take photos in one spot in my house, under a skylight in my studio or the lighting isn't right.  So, I decided that instead of just putting down some fabric, I would break out the antique linens, a cupcake stand and a beautiful painting I have.  I actually think that, at least for me, this is one of the better displays I have done for our products. 

For the close-up shots I brought a few pieces from my room out.  An old jewelry box, a vintage handkerchief, some pearls, and an antique dish.  I first tried to use a tea cup, but it just didn't look right. 
I think that these photos turned out pretty well and they really give the baby shoe pattern a keepsake feel that I wanted.  I think that I need to get some other ideas.  Lisa and I started a flickr group for creative display photos.  Check out the ideas or add some of your own.  Here

Working with Cork Fabric

So, I am not an expert in this - based on using it for one project.  However, I did a lot of research before buying it and watched quite a f...