Showing posts with label tutorials. Show all posts
Thursday, February 16, 2012
Thursday, February 3, 2011
Valentine's Day Paper Bag Album Layouts
Lisa and I had a blast getting together last week and making about a dozen of these love and Valentine's Day themed mini albums for our MadAboutScraps shop. I am personally going to use one for preschool Valentines Day Party photos. Kamille might also give one to her preschool teacher as a Valentine's Day Gift.
I made a pocket by cutting the mats in half on a diagonal. I used gems to make it look like it is attached with brads.
I layered up some prima flowers for dimension and used a large brad for the center.
I love to embellish my tags with some simple stickers.
Instead of using ribbons for the pull-out pocket pages, I used stickers to create a tab.
Friday, January 7, 2011
Shots of Love is a Top 20 Project
See Shots Of Love and 1000's of others - or share your own on Cut Out + Keep
Our fun little tutorial is a top 20 project on Cut Out and Keep. It's pretty exciting.
Here are some more of my favorite projects and tutorials featured at Cut Out and Keep:
See Burlesque Bustle Skirt and 1000's of others - or share your own on Cut Out + Keep
See Magazine Bowls and 1000's of others - or share your own on Cut Out + Keep
See Recycled Tee Circle Scarf and 1000's of others - or share your own on Cut Out + Keep
See Playing Cards Love Book and 1000's of others - or share your own on Cut Out + Keep
See Tin Can Knitting Loom and 1000's of others - or share your own on Cut Out + Keep
See Junk Mail Gift Bags and 1000's of others - or share your own on Cut Out + Keep
See Magical Key Ring and 1000's of others - or share your own on Cut Out + Keep
Sunday, January 2, 2011
Another New Years Favorites Cleanup - 100 Crocheted Flowers
This is a great site that I stumbled upon that has a round up of over 100 free crochet patterns for crocheted flowers.
So if you love all of those crocheted headbands and scull caps, I'm sure you will be able to find at least one great flower pattern.
They also have over 300 free crocheted toys and doll patterns like this adorable little bird:
Check out some of the other great free crochet patterns:
Check out some of the 150 free crocheted bag and purse patterns:
What I always try to keep in mind is that even though a pattern might look sort of ugly or outdated because of the colors, yarns, etc, it doesn't mean that I cannot make it super cute and modern with a few simple changes - like color selection, handle choices, etc.
So if you love all of those crocheted headbands and scull caps, I'm sure you will be able to find at least one great flower pattern.
They also have over 300 free crocheted toys and doll patterns like this adorable little bird:
Check out some of the other great free crochet patterns:
Check out some of the 150 free crocheted bag and purse patterns:
What I always try to keep in mind is that even though a pattern might look sort of ugly or outdated because of the colors, yarns, etc, it doesn't mean that I cannot make it super cute and modern with a few simple changes - like color selection, handle choices, etc.
Saturday, January 1, 2011
Calendar Tutorial Roundup
I thought that it would be a fun idea for New Year's Day to put together this roundup of cute calendars you can make yourself.
Nancy Morgan over at Paper Smiles made this adorable desk calendar tutorial. I just love this. This idea would really make a nice addition to your Christmas Cards. You could even use a photo instead of the stamping. For all of my sewers out there, you could use charm squares instead of the card stock for the accent papers. How cute would that be. By the way, you should really check out the Paper Smiles blog if you love papercrafting. It is loaded with great ideas.
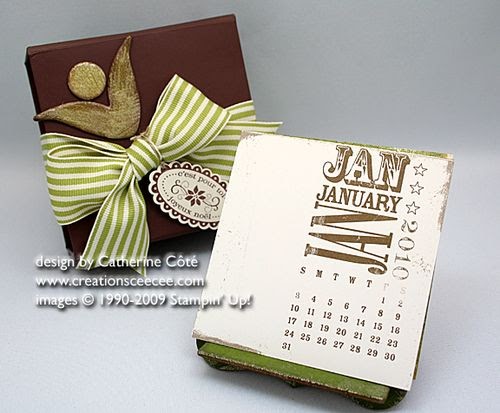
Catherine Cote at CeeCee's Creations made this great mini calendar tutorial. Everyone knows how much I love minis. This would really make a fun little project to tuck into stockings for next year or a great teacher gift. Plus, I am seeing a scrap box project here that might help me get rid of all of those tiny scraps of card stock I am currently hoarding ;).
Kelly over at AllThingsMadebyKelly made this totally fun little desk calender tutorial. I especially love that she used recycled materials to create it. This would really be a fun teen project. Just add some cheap stickers and they could really glam it up. I'm also thinking that you could put a scrapbooked photo mat into to front of the cover so that it could be a little photo frame after the year is over.
Angela Fehr from Scraps From My Table made up a tutorial for one of my personal favorite calendar projects, the cookie sheet calendar. I have probably made about 20 of these. None of them have looked as nice as hers and I made them a little differently (I used my xeron magnetic cartridge to make magnets).
Nancy Morgan over at Paper Smiles made this adorable desk calendar tutorial. I just love this. This idea would really make a nice addition to your Christmas Cards. You could even use a photo instead of the stamping. For all of my sewers out there, you could use charm squares instead of the card stock for the accent papers. How cute would that be. By the way, you should really check out the Paper Smiles blog if you love papercrafting. It is loaded with great ideas.
Catherine Cote at CeeCee's Creations made this great mini calendar tutorial. Everyone knows how much I love minis. This would really make a fun little project to tuck into stockings for next year or a great teacher gift. Plus, I am seeing a scrap box project here that might help me get rid of all of those tiny scraps of card stock I am currently hoarding ;).
Kelly over at AllThingsMadebyKelly made this totally fun little desk calender tutorial. I especially love that she used recycled materials to create it. This would really be a fun teen project. Just add some cheap stickers and they could really glam it up. I'm also thinking that you could put a scrapbooked photo mat into to front of the cover so that it could be a little photo frame after the year is over.
Angela Fehr from Scraps From My Table made up a tutorial for one of my personal favorite calendar projects, the cookie sheet calendar. I have probably made about 20 of these. None of them have looked as nice as hers and I made them a little differently (I used my xeron magnetic cartridge to make magnets).
Naptime Crafts made this really sweet countdown calendar for Halloween. I think that the same idea could be applied to any holiday or birthday. Click here to check out the countdown calendar tutorial.
Thursday, December 30, 2010
Christmas Mini Paper Bag Album Tutorial
Now that Christmas is over with, it is time to start organizing all of those Christmas photos. I thought that I would share one of these adorable little mini paper bag albums Lisa and I made up. We used black bags - $2.99 at Michael's over buy the wrapping paper. You fold 2 or 3 bags in 1/2 and then stitch down the middle with your sewing machine. You can also punch holes and hand stitch it together or tie it together with ribbons.
Then we clipped in various little embellishments. I really like variety so there are stickers, titles, and die cuts in this mini album.
For the pull out pocket pages, we stapled a die cut onto a square of card stock. It makes the book look bigger and fuller.
For a final touch, I wanted a more vintage feel than ribbon. I got 3 different colors of raffia and tied that around the spine instead of ribbon. These make really nice stocking stuffers or little thank you gifts for after Christmas.
Wednesday, December 29, 2010
Some Fun Little Winter Sewing Tutorials
Ruffles and Stuff posted this totally cute sewing tutorial for a scarf applique t-shirt dress. I would probably make a couple of changes - like maybe using some cute charm pack for the scarf and possibly doing the dress in a darker color t-shirt because Kamille trashes white within minutes. But, it is so cute. I will be making one.
Happy Together put together this little scrunchy scarf sewing tutorial - it's more of a how to than a step-by-step photo tutorial of how to scrunch up scarves. Basically, you stitch with elastic thread in the bobbin of your machine. She used a straight stitch down the scarf, but when I did this before, I did a zigzag across the scarf. Try different patterns to see what you like. Anyway, this is a great project to remake scarves you may already have. Another nice thing about this concept is that it really shortens the scarf. So, you could take an adult scarf and make it shorter for a child.
Look Ma, No Patterns came up with the great little tutorial on a simple muff pattern. I do like a nice old school muff. It is especially nice for holiday portraits. Plus, these are very simple to sew. She uses fleece, but you could easily sub faux fur or upcycle an old real fur coat you make have in the closet.
Happy Together put together this little scrunchy scarf sewing tutorial - it's more of a how to than a step-by-step photo tutorial of how to scrunch up scarves. Basically, you stitch with elastic thread in the bobbin of your machine. She used a straight stitch down the scarf, but when I did this before, I did a zigzag across the scarf. Try different patterns to see what you like. Anyway, this is a great project to remake scarves you may already have. Another nice thing about this concept is that it really shortens the scarf. So, you could take an adult scarf and make it shorter for a child.
Look Ma, No Patterns came up with the great little tutorial on a simple muff pattern. I do like a nice old school muff. It is especially nice for holiday portraits. Plus, these are very simple to sew. She uses fleece, but you could easily sub faux fur or upcycle an old real fur coat you make have in the closet.
Tuesday, October 12, 2010
Altered Canvases
This is a fun little project I did for Kamille's room. I saw somthing like this on TV and decided to make my own mini version. To make the project you need:
Doll Hangers ($3.00 for 4)
Mini Canvas - I actually use one of the $1.00 pre-printed canvases from the dollar section at Michaels/JoAnns or the Dollar Store
Ribbon
Tulle
Flower,
Scrapbook Paper
Paint
The first step is to paint the canvas in a color that coordinates with your theme. On the right, I painted the canvas black. On the left, I used a convas that was already painted purple (it had ugly flowers painted on it - from the dollar store). Once that is dry, I cut a piece of scrapbook paper to fit. Then I added some title enbellishments from the scrapbook section. To make the skirt, I gathered a piece of tulle on the sewing machine (But you could just gather with a needle and thread or gather it as you glue). I hot glued the tulle tutu skirt into the bottom edge of the canvas. Then, I glued down a piece of ribbon or other decorative trim over the top. Finally, I added the flower as an embellishment.
I tacked the straps onto the hanger with a dab of hot glue. Then, I glue them onto the front of the canvas. Finally, I covered that up with ribbon bows.
You can put a photo on the scrapbook paper. I haven't gotten that far yet, but I will probably put a pic of Kamille and a couple of her friends on these little photo frames. You could make a really huge version of this with a child's hanger.
Wednesday, September 29, 2010
D is For Darts
When sewing garments and accessories darts are an essential technique to master in order to create a great fit/shape. Darts can be straight or curved depending on desired effect. A straight dart will give you an easier, looser fit while a curved dart will be more form fitting.
===========================================================================
Check out this tutorial on one of my personal favorite sites, Sew Mama Sew. This blog is amazing! Full of great tips, tricks, and tutorials. I have to admit I like to check it out every day! It goes over the importance of darts in the fit of a garment with and easy to follow picture tutorial and instructions. The triangle areas seen in the photo below represent the actuall dart placement on the garment pieces, in this case a dress. Darts will be used in this instance to take in the fabric where each dart is placed to create a formed fit.
===========================================================================
Joanna over at Stardust Shoes has a great tutorial showing you how to take in your pants using butt darts.
===========================================================================
Check out this fun and elegant pleated bag tutorial from Lisa Lam (which is funny because that's my name too!!) at U Handbag. With a change of fabric, this would be perfect for a wedding or holiday party. In this instance, the darts give the bag a fun shape and detail.
============================================================================
Threads Magazine has a great video collection. Included in this collection are two videos that would be useful for marking darts and sewing darts in your fabric projects. This collection is a super valuable tool for novice and intermediate sewers.
=============================================================================
Happy Crafting!
Subscribe to:
Posts (Atom)
Working with Cork Fabric
So, I am not an expert in this - based on using it for one project. However, I did a lot of research before buying it and watched quite a f...
-
I've made quite a few baby doll slings in the past and I also have a really great pattern in my craftsy shop for a cotton baby doll sli...
-
I actually got hooked on masks in Iceland. If you have never been, I totally recommend a trip there. However, if you are a neurotic sl...
-
Sewing Hack I love to use serger thread for many of my projects. Let's face it, serger thread is cheap. The giant spool is $2.00. ...