Well, after finding my newest make up brush ruined in the bathtub (apparantly it was part of a barbie makeup salon that took place in this morning bath) I decided that it was high time to make myself a new make up bag instead of just throwing everything loose into a drawer in the bathroom.
Well, after searching around for some makeup bag tutorials, I was really disappointed. They are basically glorified pencil cases and offer little actual organization - I wish I still had my old caboodle!
Then, I found a very simple concept - the make up roll. It's really similar to the knitting needle roll, but for your make up and brushes.
You can find the tutorial here at LBG Studios. I liked the basic idea of this and with this really simple design you could seriously just fold a really nice single placemat and create this same concept without measuring or really much work at all.
I wanted something a little more complex so I changed her original design up a bit. I added pockets to store eye shadow, blush, etc. and a flap the keep everything from slipping out of the top. The middle pocket is for the brushes and I made one of the parts a little wider to hold a mascara.
Then, I didn't really care fo the plain exterior so I jazzed it up with some ribbon roses. I actually picked these scraps up off of the floor next to the cutting table to turn them into these roses.
I'm sure that we previously posted a tutorial for these roses on the blog, but if not, here is another great tutorial that shows you how to make srap fabric roses from SippyCupMom.
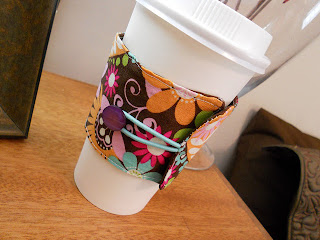
Finally, I am not into the ribbon tie closure. In my experience, they just come untied or turn into an impossible to untie knot. So, I loved this idea for a closure that I saw in this great coffee sleeve tutorial from Liberate Creativity.
See how there is elastic cord (I think that this is actually a hair rubberband which is genious because then you can get the cord to be any color you want.)
So, here you can see that I used the same type of closure on my make up roll, a button with elastic cord so that the roll can easily expand at I add more make up.
Now you see why I call it CRAFT FUSION. I used the pieces from three totally unrelated tutorials to make one great project. .
Friday, November 4, 2011
Wednesday, November 2, 2011
New Pattern Preview
First, sorry about the lack of blog posts recently but with our girls going back to school and the never ending responsibilities of being on the board of our coop preschools it has been a rough start to the new school year. Plus, we have been so busy working on getting our Granola Tree products into specialty markets that there just hasn't been much time for fun crafting. But, we did take a little break out this Halloween to work on developing our newest pattern, a circle skirt. I should have this pattern posted in our shop in the next week or so. These skirts are so simple to sew and only take about 20 minutes each. The best part about this pattern is that it uses the super wide waistband elastic which really saves time as you do not need to sew an elastic channel. Also, it add to the comfort of the skirt which is really important if you have a sensative kid like mine. These skirts are done in a holiday print but would be cute in solids, wild safari prints or just about any other combination you might fancy. If you are feeling really lave you could make a no hem option with jersy or maybe glam it up with that confetti dot fabric.
Subscribe to:
Comments (Atom)
Working with Cork Fabric
So, I am not an expert in this - based on using it for one project. However, I did a lot of research before buying it and watched quite a f...

-
I've made quite a few baby doll slings in the past and I also have a really great pattern in my craftsy shop for a cotton baby doll sli...
-
Proof positive that I have a sickness when it comes to crafts is my newest project for the day. I just spent almost two hours making this t...
-
Sewing Hack I love to use serger thread for many of my projects. Let's face it, serger thread is cheap. The giant spool is $2.00. ...


