
Friday, December 2, 2011
Wednesday, November 30, 2011
Anthropologie Christmas Tree Hacked
I saw this tree for $48.00 on Anthropologie. It is cute, but not that cute. So, I was inspired to create a new weekly blog feature where I will hack high end crafts and show you the cheap and easy tutorials for making them.

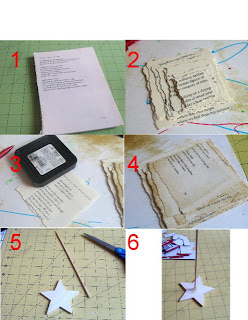 1) I used an old book of poetry. The size of your tree is limited by the dimensions of your book. With this book, the largest piece I could cut was 5 1/2"x 5 1/2". I used a craft knife to cut the pages out of the book. The original uses sheet music. I used a book with heavy pages so that it would hold up well. If you have a really old book, then you will not even need to use ink to age the pages.
2) Cut your squares starting with your largest size - here 5 1/2" with the decorative scissors. I cut 4 of each size. The dimensions went down by 1/4" increments. So, the next size I cut was 5 1/4" and so on until I got down to 1" squares.
3) Next, Kamille inked all of the pages for me, which is a great way to get your kid's help.
4) You can see all of the pages have been inked.
5) I took a small wooden cut out of a star (it can be anything - even a piece of heavy cardboard) and a skewer from the kitchen.
6) Glue the skewer onto the wood with a big glob of hot glue. I initially planned to put it into a small wooden bead for extra support but I could not find them anywhere so I just used a huge glob of hot glue. I'm pretty impatient so I cooled it off really quickly with compressed air, but you can just hold it there until it is dry.


Supplies
wooden shish kabob skewer
wooden shape for base
old book
scissors (preferably decorative edge)
glitter - optional
hole punch
cardboard
ink pad for aging (optional)
beads/ornament for topper
So everything I used I already had right here at home.

2) Cut your squares starting with your largest size - here 5 1/2" with the decorative scissors. I cut 4 of each size. The dimensions went down by 1/4" increments. So, the next size I cut was 5 1/4" and so on until I got down to 1" squares.
3) Next, Kamille inked all of the pages for me, which is a great way to get your kid's help.
4) You can see all of the pages have been inked.
5) I took a small wooden cut out of a star (it can be anything - even a piece of heavy cardboard) and a skewer from the kitchen.
6) Glue the skewer onto the wood with a big glob of hot glue. I initially planned to put it into a small wooden bead for extra support but I could not find them anywhere so I just used a huge glob of hot glue. I'm pretty impatient so I cooled it off really quickly with compressed air, but you can just hold it there until it is dry.

7) Next, I used an old usps box that someone sent paperwork in to make the separators. Any old cardboard or foam core or thin Styrofoam will work. Cut it down into 1" squares.
8) Then I layered 1 book sheet and 1 square. They just poke down onto the skewer.
9) Here you can see how it starts to build up really quickly. Just spiral the pages as you go.
10) When you get up to the top where the pages are under 2" you need to cut the cardboard squares a bit smaller. When the squares get small they get hard to stab onto the skewer so I actually punched a small hole into each square of cardboard for the last few on the tree.
11) The tree might be shorter than the skewer, depending on what size pages you started with. Just cut the top off with scissors about 1" from the top.
12) Finally, I glued some beads on as my topper. The original used a small glass Christmas ornament with the metal hanger removed. You could use a star, a tiny angel, whatever you want. I like glitter, so I used some scrapbook glitter glue on the edges.
Tuesday, November 29, 2011
50 Things to Make from Your Mismatched Socks

After looking at the laundry basket full of orphaned socks we have, I decided to put together this tutorial roundup of loads of things to make or do with your old socks. There are so many great things I never even thought of until I started this roundup. I love how creative people can be.
- Bean Bags - from A Little Tipsy
- Long Winter Gloves - From Ruffles & Stuff
- Fingerless Gloves - From Cut Out & Keep
- Armwarmer Gloves - From At Home In Sussex
- Dog Chew toys - from Ehow
- Tiny Dog Sweater - From Dogs We Luv
- Pin Cushion - from Unfortunately Oh!
- Cleaning Rags - From Money Saving Mom
- Bunny Slippers - From Violet Le Beaux
- Pot Holders - From Phinnywood
- Paper Pieced Soft Ball - From Recycle Crafts
- Legwarmers - From Hand Maid Liset
- Barbie Clothes
- Sock Snowmen
- Home Dec. Chair Remake -From Design Your Revolution
- Coffee Sleeve - From Parents
- Scarf - From Charlotte's Fancy
- Sock Elephant - From Fretta
- Sock Bunny - From Crafting Hazard
- Sock Monkey - from Super Sock Monkey
- Sock Catterpillar - From Danielle's Place
- Sock Dog - From Danielle's Place
- Sock Cat - Danielle's Place
- Sock Reindeer or cow - Danielle's Place
- Sock Vase Remake- From Craft Stew
- Sock Wreath - From Whip Kits
- Stocking Ornament - From Sara Sweet Surprise
- Doughnut play food- From Rook No. 17
- Beanbag Cradle for your Camera -a great substitute for a tripod for use on bumpy or other unstable surfaces. Fill the beanbag with rice of bean and then set your camera inside to steady it.
- As Bands to How Yarn - From Citric Sugar
- Use to polish your shoes
- Homemade hacky sack - from Planet Green
- Fill with rice or lavendar and make an eye pillow or other soothing pillow. - From LiveStrong
- Use as a soap holder for the garden or bathtub. Helps scrub off the grime and keep the soap from slipping out of your hands.
- Draft Dogger from old tights or knee socks. From Re-Nest
- Save old socks to wrap up items when moving or fragile Christmas Ornaments.
- Fill with potpori for drawers or closets. From Wondertime
- Make a sock frog.
- Make a cat toy buy filling with catnip.
- Use to store golf balls, tennis balls and other small toys.
- Use them to make wrist rests.
- Use over ice packs.
- Make a sock purse. from Ehow
- Make baby legwarmers. From Ehow
Extend the Life of Pajamas - Save the top part and sew them onto the arms and legs of children's pajamas to extend the usage of the pj's.
DIY Chia Pet - From MaddiesMinnions
Hobby Horse - Horse on a Stick : - How to make a Horse on a Stick, a good toy for older toddlers (a few of the steps may cause a choking hazard). This is a perfect activity for children four and up, however would require adult supervision. from Ehow
Weave a Jump Rope - With this classic finger-weaving project, kids can get a jump on outdoor playtime by recycling their old socks and outgrown tights into a colorful homemade toy.
Lunch Money Holder : - With this clever change purse, your child will be able to keep all his cafeteria cash up his sleeve until he needs it.
About 50 more tutorials for making socks puppets, dolls, and other kids crafts can be found at ArtistsHelpingKids.


Subscribe to:
Posts (Atom)
Working with Cork Fabric
So, I am not an expert in this - based on using it for one project. However, I did a lot of research before buying it and watched quite a f...

-
 I've made quite a few baby doll slings in the past and I also have a really great pattern in my craftsy shop for a cotton baby doll sli...
 -
 Proof positive that I have a sickness when it comes to crafts is my newest project for the day. I just spent almost two hours making this t...
 -
 Sewing Hack I love to use serger thread for many of my projects. Let's face it, serger thread is cheap. The giant spool is $2.00. ...