Showing posts with label sewing pattern. Show all posts

Thursday, November 10, 2016

Get the most from your fabric

Have you ever purchased a pattern and followed the cutting guide only to end up with a bunch of odd sized, wasted fabric scraps?  I used to do this all the time.  Then, if you are like me, you cannot bring yourself to throw all those scraps out so you have comforter bags full of scraps you may never use.  In the last several years I've made 3 big strides when it comes to scrap fabric.  1) I do throw out some of the scraps...if they are too small for me to ever use.  I'm going to make one caveat here.  I save many even tiny scraps of fabric like fleece because I use it as stuffing!  Mind blown right.  Along with traditional batting, I use my fleece scraps to stuff soft dolls.  2) I organized my decent sized scraps into plastic shoe boxes by color.  I got them from the dollar store.  It may sound dumb, but just having them sorted out gets me using the pieces.  Sometimes I just need a little bit of red for a pocket.  Instead of cutting yardage, I check my scraps first.  3) Finally, I changed the way I cut patterns.  I don't even look at the cutting guide any more.  I lay out the fabric and the pieces and reposition them until I get the least wasteful layout I can find.  Once you do it a few times, you will see that it saves so much fabric and it doesn't add much time onto your cutting.

One of the biggest things you need to accept to save fabric is that the factory folded edge isn't the only folded edge a piece of fabric can have.  You can refold it however you want!


  This is just an example.  With my raglan top pattern, if I used traditional fabric layout, I'd need over a yard of fabric to make a toddler top.  That's just crazy.  Plus, I'd end up with a weird piece, cut off from the folded edge.  What would I do with it?  Instead, I folded over the raw edge and the folded edge to make 2 double folded edges.


 Now I can cut out 2 sleeves (on the fold) and the front and back (on the fold) from 1/2 yard of fabric.  Even If I only needed to cut out a sleeve, I'd still use this technique and fold over the raw edge.  Then, I could cut out my 2 sleeve at once on the fold and have a nice, large piece of my fabric left with the factory folded edge to use on another project.
avoid fabric waste by refolding fabric

Wednesday, March 5, 2014

Free Snack Bag Sewing Pattern for Easter

Head on over to my craftsy shop to download your free copy of this adorable carrot snack and treat bag sewing pattern.  You can make 2 bags with 1 orange and 1 green fat quarter and some satin ribbon.  The bags stitch up in under 20 minutes.  The downloadable pattern and tutorial have step-by-step, full color photos, instructions, and the printable pattern pieces.  I even teach you my super technique for fray proof seams without a serger or other special equipment.  In fact this is a basic pattern, easy enough for a beginner and can be sewn on the simplest machine.  Please share on pinterest or your blog with a link back!

Tuesday, March 20, 2012

Shorts, Capris, and Pants Sewing Pattern

Well, I just spent the last two days finishing up this new pattern for the summer: shorts, pants, and capris pajamas in newborn - 12.

Monday, February 20, 2012

My Newest Pattern - Easter Bunnies

I've been busy working up a few new patterns for Easter.  This is a project I have been wanting to have time for for over a year.  They are little tagimals, i.e. little bunnies with tag or tabs sticking out for teething babies, plus the little carrot teethers. 

Next, Bunny Bowling, Easter Baskets, Bucket Hat, and some other gems.

Saturday, February 18, 2012

Felt Food Tea Bags Tutorial

I always try to make something handmade to go along with any gifts I give.  I think it makes it more special when people know you took a little time to make something.  One of my favorite things growing up with three sisters was having tea parties.  My daughter loves having parties with her stuffed animals or friends.  
This is a fun little tutorial I put together for my daughter's play kitchen.  She loves to run a cafe and serve up all of her customers tasty treats.  Normally she makes me coffee - if that says anything about how much coffee I actually drink - but I wanted to make some tea bags for her to play with.


So I just started with those organza jewelry bags.  I cut the ribbons out of the bags by just snipping off the end and pulling them out.


I just cut out a rectangle of black felt and placed it in the bag to represent the tea leaves.  I wanted to use chunky glitter or confetti, but we only had red, so I went with the black felt.


Then, I put one of the ribbons I pulled out of the bag into the top and stitched the sack shut. 


 Finally, I stitched down a small square of felt for the tab.  I would have ironed some little gems or monogram applique on if my iron was working.  I guess that three years of using it every day while sewing has finally burned it out. 

So, here is the set of 4 that I made.  On a side note, this would be a super cute project for a baby shower favor or bridal shower favor filled with bath salts instead of felt. 

I put links to the supplies below.  I usually buy things in bulk online because I often make lots of the same items and put them in my etsy shop or sell them at craft shows. 

Friday, November 18, 2011

Boy's Sleep Pants

This pattern is a great all around pattern.  Made from cotton they are nice relaxed fit pants.  Make them from flannel for PJ bottoms.  Boys love to choose out their own fabrics jsut as much as girls do. 


The pattern is unisex so it works for girls and boys.  Click here for the pattern.

Thursday, November 17, 2011

Baby Booties Pattern - Great Charity Donation

These adorable little booties are a great way to use up scraps of fleece left over from other projects, plus they make a nice gift or charity donation.  With Christmas right around the corner, I am always looking for ways to give back and celebrate the amazing life I have by helping others.  Check out the pattern here.

P.S. - they are just as cute in camo or other boy prints. 

Wednesday, November 16, 2011

Dress Up Clothes Patterns

Looking for a great gift for this holiday season?  How about dress up clothes for toddlers/preschoolers.  I even donated several to the preschool classroom.

You can make 2 for under $8.00.  Talk about a great and affordable gift.  Plus, what little kid doesn't like dinos and dragons?  We also have bears, puppies, cows, and more.  Here.

Monday, November 14, 2011

Doctor Kit Pattern

This is one of my favorite patterns and I just love making it for birthday or Christmas gifts.  Sometimes I throw in a couple of stuffed animals and make it a vet bag instead of a doctor kit.

You can find this great pattern and many more in our store http://www.greenpatterns.biz/.  Click here for the direct link.

Sunday, November 13, 2011

Neckwarmer Tutorial

This is a really easy project from the scrap bin.  I think that it took about 15 minutes.  Plus, it would make a nice gift for any child or adult.  P.S. I am trying a new format for the tutorials on the blog and trying to shrink the photos and make the tutorials easier to read and print out. 

I used fleece because I had a little scrap perfectly sized for this project.   
1) Cut a rectangle of fleece (or jersey) about 12"x24".  (8"x18" for a child's size) 
2) Using a piece of double fold bias tape about 14" long open the tape.  Fold over the raw edge about 1".  3) Pin in place down the length of the scarf.  Fold the bottom edge up and pin so that there are no raw edges on the bias tape.
4) Stitch down both sides of the bias tape and then down the middle using the crease as a guide.  Do not sew the ends shut.  They need to be open so that you can thread the ribbon.
5) The easiest way to thread the ribbon is with an elastic threader.  This little gadget costs about $3.00 and is worth every penny.  If you don't have an elastic threader, you can use a safety pin hooked through the end of the ribbon.  Start at the bottom. 
6) Go up through one side and then down through the other side. 
 
7) As you can see, you will have the ends of the ribbon hanging out of the bottom of the scarf.  Pull on the ends evenly to gather up the scarf. 
8) Fold the scarf RIGHT SIDES together and stitch up the side seam.  Trim off any excess.
9) Tie a bow in the ribbon at the bottom of the scarf.  The easiest way to keep the ribbon from fraying is to seal it with a lighter. 
10) Finished neck warmer. 

Saturday, October 15, 2011

Boy's Necktie and Bowtie Pattern

This is far and aways our top selling pattern and it is actually a really great beginner project.  Plus, it is time to get a jump on Christmas crafting.  These are great in portraits and actually sell really well on etsy.

Shop our Green Patterns store for this great pattern available as an instant download.

Thursday, August 11, 2011

Back to School Roundup Week

I thought that we would spend this week putting together some roundups for back to school.  It really seems to be coming up fast.  I know I have been trying to get my little one back on her school sleep schedule. 

Today, I put together a round-up of backpack tutorials. 

The first tutorial is a simple string backpack from Mama Urchin.  Click here to go to the backpack tutorial.


This next tutorial is great because it uses an upcycled flour bag.  You could use any fabric you wanted, but I love the fack that it uses reused materials.

Click here to get the pattern from indietutes.

Here is another very simple backpack pattern and tutorial from The Sewing Dork.


This isn't a backpack for your kids, but I still love this project.  This little backpack is a gift bag or photo album.  I thought that it would make a great back to school gift for the teacher.

Creatin With Kristin Made this adorable backpack.  I think that I will make one for my daughter's preschool teacher in some more appropriate colors.  Click here for the scrapbook backpack tutorial.

Saturday, January 22, 2011

Glitter Scarf Tutorial

My niece and daughter are totally obsessed with glitter/sequin scarves.  Those things are expensive.  I personally have a hard time justifying spending $15-$18 on an accessory for a 3-yr-old or even a 7-year-old.  So, this Christmas, Lisa and I made up a bunch of the scarves at much more affordable prices.  I have a NO SEW and a LOW SEW version of the scarves below.  JoAnn and Walmart both sell a fabric they call confetti dot fabric.  It comes in about 10+ colors.  The fabric is about $6.00 a yard (but you can score it for much less with a coupon or buy purchasing a remnant).   

 Because this fabric does not run or fray to speak of, you can make a really cute scarf by just cutting an 8" strip.  If you cut anything narrower, it tends to roll (which makes a nice scarf for American Girl Doll).
I also made a doubled version by cutting 2 8" strips and stitching them together.  I left the ends open for turning. 

These scarves a played with/worn around here everyday.  The single scarf is about $1.00 and the double scarf is about $2.00 (when you buy the fabric with a coupon).

I made the no sew scarves a couple of years ago as party favors for my niece's glamour makeover birthday party.  They were a hit. 

Wednesday, January 19, 2011

Free Receiving Blanket Tutorial for Konbit Sante Craft Hope

This morning I put together this tutorial on making a basic receiving blanket.  No Serger Required. 

This tutorial will make a blanket sized for swaddling.  Most receiving blankets you buy from the store are sized 30"x30" which is not ideal for swaddling. 

  You start with a 34"x36" piece of flannel.  I cut it with the rotary to make sure that it was perfect. 
Next you can serge the edges or you can use an overcast zigzag stitch.  To make an overcast zigzag, you need to set your machine to the widest zigzag setting.  I keep the stitch length short.  You should line the fabric up in the middle of the foot.  In the right position, the needle will not catch your fabric. 
 In the left position of the zigzag stitch, the needle will enter the fabric.  This overcast zigzag will encase the raw edge to prevent fraying in the wash.
Stitch around the entire blanket.  It might cause the fabric to wave, so you will want to press the blanket when you are finished. 
Finally, I added a little double heart applique by ironing some craft fuse onto cotton and then fusing it to the blanket. 

Saturday, January 1, 2011

Calendar Tutorial Roundup

I thought that it would be a fun idea for New Year's Day to put together this roundup of cute calendars you can make yourself. 

Nancy Morgan over at Paper Smiles made this adorable desk calendar tutorial.  I just love this.  This idea would really make a nice addition to your Christmas Cards.  You could even use a photo instead of the stamping.  For all of my sewers out there, you could use charm squares instead of the card stock for the accent papers.  How cute would that be.  By the way, you should really check out the Paper Smiles blog if you love papercrafting.   It is loaded with great ideas.


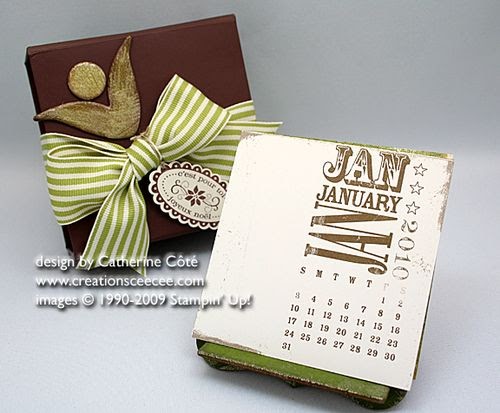
Catherine Cote at CeeCee's Creations made this great mini calendar tutorial.  Everyone knows how much I love minis.  This would really make a fun little project to tuck into stockings for next year or a great teacher gift.  Plus, I am seeing a scrap box project here that might help me get rid of all of those tiny scraps of card stock I am currently hoarding ;).   

Kelly over at AllThingsMadebyKelly made this totally fun little desk calender tutorial.  I especially love that she used recycled materials to create it. This would really be a fun teen project.  Just add some cheap stickers and they could really glam it up.  I'm also thinking that you could put a scrapbooked photo mat into to front of the cover so that it could be a little photo frame after the year is over. 


Angela Fehr from Scraps From My Table made up a tutorial for one of my personal favorite calendar projects, the cookie sheet calendar.  I have probably made about 20 of these.  None of them have looked as nice as hers and I made them a little differently (I used my xeron magnetic cartridge to make magnets). 
Naptime Crafts made this really sweet countdown calendar for Halloween.  I think that the same idea could be applied to any holiday or birthday.  Click here to check out the countdown calendar tutorial.

Wednesday, December 29, 2010

Some Fun Party Hats

New Year's always makes me think of party hats.  Plus, everyone who knows me knows I LOVE hats, esp mini hats.  So, here are some great party hats for many occassions.

This first set of hats is from Girl Inspired.  This is by far one of the cutest blogs I have come across.  Mostly owing to her great choices in fabrics. 

Kamille would die for these Olivia inspired party hats from SweetMintStudios.

This Cookie Monster hat from BabyBoydBlog is SOOO cute.


Some Fun Little Winter Sewing Tutorials

Ruffles and Stuff posted this totally cute sewing tutorial for a scarf applique t-shirt dress.  I would probably make a couple of changes - like maybe using some cute charm pack for the scarf and possibly doing the dress in a darker color t-shirt because Kamille trashes white within minutes.  But, it is so cute.  I will be making one. 

Happy Together put together this little scrunchy scarf sewing tutorial - it's more of a how to than a step-by-step photo tutorial of how to scrunch up scarves.  Basically, you stitch with elastic thread in the bobbin of your machine.  She used a straight stitch down the scarf, but when I did this before, I did a zigzag across the scarf.  Try different patterns to see what you like.  Anyway, this is a great project to remake scarves you may already have.  Another nice thing about this concept is that it really shortens the scarf.  So, you could take an adult scarf and make it shorter for a child. 


Look Ma, No Patterns came up with the great little tutorial on a simple muff pattern.  I do like a nice old school muff.  It is especially nice for holiday portraits.  Plus, these are very simple to sew.  She uses fleece, but you could easily sub faux fur or upcycle an old real fur coat you make have in the closet. 

Saturday, September 25, 2010

C is for Chenille - Roundup and Tutorials

Making Your Own Chenille

This is a great tutorial on making your own chenille fabric from freshvintage.typepad.com.


She does a wonderful job of explaining exactly how to create the traditional chenille fabric.  I actually thought that the piece of fabric she created and then used to make the doll body would have made a beautiful chenille baby blanket.  Click here for her full free tutorial on chenille.


Over at the Happy Things blog, she has a wonderful tutorial on making simple baby bibs backed with commercial chenille. 


Click here for her free chenille tutorial and to take a look at her beautiful blog.  


I have long loved vintage chenille and I always see vintage chenille bedspreads at really affordable prices at flea markets, garage sales, and antique stores. 

Here are some of my ideas to making things out of old chenille:

Bibs
Diaper Bag
Pajamas
Pillow cases
Baby/Toddler Jacket
Baby toys
Dolls
Monsters
Slippers
Nursing Pillow Cover
Window Valance
Bunting for baby room

You could cover those huge cardboard letter in chenille. 

You could also use chenille to upholster a chair for a child's room or to create a sweet cushion cover for a rocking chair.

Basically, you can look at a vintage chenille bedspread as a huge piece of fabric.  I know some people don't like the idea of cutting up vintage linens, but what good is it just sitting in a closet somewhere.

I would love to see a vintage chenille bedspread made into a whole gift set for a baby shower: burp cloths, bibs, a small crib blanket, baby booties, diaper bag, diaper organizers, mommy journal or photo album cover.  How sweet would that be to present at a shower?

  HAPPY CRAFTING!


Wednesday, September 22, 2010

B is for Bias Tape: Ideas, TIps, and Tricks

What is bias tape?

For a beginning sewing bias tape can be very intimidating.  In fact, I have been sewing since I was 4 and I just started using bias tape about 2 years ago.  I used to have my mom come over and put the bias tape on any project I needed it for.  Then, one day she wasn't around and I had to do it myself.  It actually is much easier to work with than you might think. 

In technical terms, Bias tape or bias binding is a narrow strip of fabric, cut on the bias (UK cross-grain). The strip's fibers, being at 45 degrees to the length of the strip, makes it stretchier as well as more fluid and more drapeable compared to a strip that is cut on grain. Many strips can be pieced together into a long "tape". The tape's width varies from about 1/2" to about 3" depending on applications. Bias tape is used in making piping, binding seams, finishing raw edges, etc.

Commercially available bias tape is available as a simple bias tape, single-fold bias tape, and double-fold bias tape. Single-fold bias tape is bias tape that is folded in half lengthwise on its center line, wrong side together, and pressed. Double-fold bias tape is single-fold bias tape where each half is again folded in half lengthwise, wrong sides together, and pressed.  - http://www.apparelsearch.com/definitions/miscellaneous/bias_tape.htm


What can you do with bias tape?  I created this etsy treasury to show that many kinds of bias tape available and some of the creative projects people are making with bias tape.

'B is for Bias Tape' by c1h8r9is


granny bag sewing p...

$7.50
Vintage Notions Ban...

$12.50
Bumble Bee Dolly an...

$20.00
Kimberly Royal Bias...

$2.75
Christmas Owl Banne...

$60.00
Sunglass Case / In ...

$5.00
Linen bias tape -- ...

$7.50
Sweet and Simple PO...

$4.00
Trendy Flared Full ...

$26.95
Fabric Bunting - Pa...

$19.00
Handbag Like A Whit...

$118.00
Out of this world l...

$7.00
The Wright Rainbow ...

$8.00
Orange Flowers Chec...

$7.00
BUBBLEGUM PINK GING...

$8.40


Lisa and I also have a few patterns that use bias tape.  One of my favorites is the rumba ruffled diaper cover. 


We used bias tape to make an easy elastic casing for the diaper cover. 

Here is a great tutorial on applying bias tape from sewneau.com:


Click here to find the step-by-step guide to applying bias tape and many other great tips and tricks.

Another great tutorial on applying bias tape is provided by Wrights - one of the leading commercial manufacturers of bias tape.


Click here to take a look at their free bias tape tutorial.

Working with Cork Fabric

So, I am not an expert in this - based on using it for one project.  However, I did a lot of research before buying it and watched quite a f...