Labels

Showing posts with label SewingPattern. Show all posts

Thursday, April 9, 2020

Turn old shirts into new scrunchies

It took me 4 hours but I managed to make my first video tutorial.  I'm pretty proud of myself for sticking with it.  Since I've lost all track of time during the stay home stay safe orders, I've forgotten about my nails.  They were a train wreck in this video.  Thanks to my mom for immediately pointing that out.  ;) 

Since I wait til the last minute for everything, I'm trying to put together some last minute Easter basket stuffers and I thought scrunchies would be a great addition.

I'm using some old t-shirt fabric to make these.

I really prefer t-shirt scrunchies as they are softer.  If you want to use cotton that works too.

For this pattern you need a 3"x14" strip of t-shirt and another piece about that size to make the optional bunny ears tie.

The tie is cute and functional.  It's covering over the seam on the scrunchie.  I am not ladder stitching a freaking scrunchie together.  Not happening!


Supplies:
Scissors 
T-shirt fabric
Elastic threader
Tube turner
1/8" elastic
Pins


If you don't have an elastic threader or a tube turner you can make a safety pin work.  I invested in some additional tools and it really makes sewing more enjoyable.

 Full disclosure I used all my 1/8" elastic for face masks I donated so I used some fold over elastic I had...but I would have really preferred not using good elastic inside of these.  

Please tag me in your finished scrunchies on Instagram @indipatterns.

I hope you enjoy this beginner project. 

For those of you who don't feel comfortable cutting without a pattern, you can download the 1 page printable pdf pattern here.  


Wednesday, April 8, 2020

Bonnet Sewing Pattern

I've used this bonnet pattern so many times.  It's great for holidays and baby shower gifts.
 It's fully lined and can be reversible.


Always remember when you are printing pdf patterns you need to set your printer to actual size - not fit to page.  If you print this pattern as fit to page you will be making a pattern for a doll, not a real baby.

I've recently used this pattern to make an Easter bonnet for my 4 year old niece.  This pattern is really sized for little babies.  But, I added an extra 1/2" all around when I cut it out and it made the perfect bonnet for a 4 year old.  With the stay in place orders, I've been getting my sewing supplies online from www.CreateForLess.com.
I added ears into the bonnet.  It's pretty easy to do. 
It's clearly getting some use for the entire Easter season.  

I also made a really pretty embroidered version of the bonnet for Easter service.  


These photos are not great.  With all the social distancing, I'm trying to give some of the peeps at home space and take pics in the sewing studio rather than my well lit living room.  It's not working out as well as my normal photo set up.  A while ago I bought a Brother Embroidery Machine.  I love this thing.  I've been embroidering on all my projects since I got it.  It's more than paid for itself just in savings on sportswear.  I'm able to personalize all my kid's cheer, swim, and lacrosse gear.  I use this machine: Brother SE1800 Sewing & Embroidery Machine

Actually I also used the machine to do the Easter Baskets in the photo above.  Like I said, I've gotten more than my money's worth out of the embroidery machine.  I've done hats, wallets, chap stick holders, backpacks, socks, and so much more.  I really love having it.  It comes with lots of built in designs, but it also hooks to the computer so you can buy other patters, make your own, or get them for free and just download them right into the machine.  

Also, if you are looking to step up your sewing game, try taking an online class with blueprint.  That's how I learned so much about zippers.  Get Started With Bluprint  For the next couple of weeks all the classes are free.  There are 2 AMAZING heirloom sewing classes.  I love these techniques - because you can make something plain look fancy.  I used pin tucks on this baptismal bonnet.  I learned how that technique from an online class.  Even an experienced sewist can learn new techniques.  


Monday, March 16, 2020

Free Easy Beginner Spring Chick Sewing Pattern

Looking for a cute and easy little project to sew while you are stuck in the house?  This little chick is a favorite of mine.  It's are really silly little project that you can make with scraps.  I love how easy it is the sew up these little guys.  It's a fun little project to make now for Easter.

I used safety eyes, but you could also use buttons.  If you are looking for a way to keep kids busy, they are sew these up and glue the faces and eyes on or hand sew on faces and eyes if you make the bodies for them.

Download the free pattern here.

Thursday, March 5, 2020

Free Pretty Petal Bib Sewing Pattern

 I just love this free pattern.  It makes a really sweet baby shower gift because it rolls up so nicely into a flower.  It's very easy to sew and I make it with scraps or fat quarters.


Click here for the free petal bib sewing pattern.

I love patterns that use of scraps.  I actually keep my scraps in plastic shoe boxes like the ones above.  I used to keep them crammed into a bag and I never ended up using them because it was such a pain to find them.  Taking the time to organize the scraps into small bins has made a huge difference.  When I'm done with a project, I just put the scraps away right away.


This pattern uses bias tape.  If you have not used bias tape before, it's a good pattern to try it out with.  I make my own bias tape most of the time. I put a link below to the bias tape makers I use.  I used to press my tape and make it totally by hand.  What a pain! You can also use a special foot for your machine.  I typically use sewing clips and my regular foot.  Sometimes I'm just too lazy to switch out the feet. But, the bias tape foot it worth using if you plan on making several of these bibs.  You can also use premade bias tape.  I like making my own because it's less expensive and you don't have to use standard colors.  That said, if I'm in a hurry I will use some premade tape. 

Monday, March 2, 2020

Easiest Skirt Pattern Free PDF Sewing Pattern and Tutorial

I adore this pattern and use it all the time.  It's great for everyday sewing if you have a girl who likes skirts.  It's also perfect for quick holiday outfits.  This is a great pattern for craft shows too.  These little skirts sew up so quickly.

-------------------------------------
Supplies:
-------------------------------------
Elastic puller
Waistband elastic
Cotton or other fabric
Sewing Scissors


You can thread the elastic through the waistband channel with a big safety pin.  I did that for years.  Then I finally bought a set of the flexible threaders above.  Holy cow are they amazing.  These things are cheap and they save you so much time.  It's a must have in my sewing studio.  In fact, I have 4 or 5 because my daughter kept using them as riding crops for her American Girl Doll ponies so I just kept buying more and more.  Now I have a stockpile of the things.  Totally worth it.  Another pro tip is that I buy my elastic in bulk.  It really ticks me off when I have to spend $5 for enough elastic to make 1 skirt  I just order it online ahead of time and always have a stockpile.

I've been using this pattern for years.  Above you can see that I made skirts from satin in the Stewart Clan Tartan for Christmas  It's great because it fits so many sizes.  The same pattern is used for the little toddler all the way up to my lovely teenage niece.  These skirts sew up in under 20 minutes if you are an experienced sewist - probably a little longer if you are a beginner.

I actually started making this pattern because it's so great when you need something for a holiday party at school or a special skirt for a birthday party.


You can really change up the look by using different fabrics and trims.  Once you have made a couple of skirts with this pattern you will see how easy it is to alter.
 Here is another variation of the skirt I made for a cowgirl birthday.  I replaced the bottom band with lace to make an adorable cotton cowgirl skirt for this birthday party.


Here I used it to make the skirt for my daughter's Poison Ivy Costume for Comic con...FYI she won best costume in the kid's contest.  Lady joker's skirt is a different pattern that I will have up in a couple of weeks that I also love.

These skirts can be made out of basically any material.  I've used cotton, organza, satin, special occasion fabric, and even knits.

Another thing I love out this is that there is an option with the bottom band.  That is great for a beginner because there is no hemming.  It makes it sew up really quickly.

Click here to download the free printable sewing pattern for the skirt.

Don't forget to follow us on Facebook  www.facebook.com/Indiepatterns

Tag me in the finished projects on Instagram @indipatterns #indipatternsmade


Saturday, February 29, 2020

Bunny Poncho Free Printable Sewing Pattern and Tutoral

This is an older project because this little girl is now a teen, but I was thinking of making a few new ponchos for my little niece in preschool.  I designed this project specifically for younger kids.  In truth, I was totally sick of helping my kids take dress up clothes on and off so I made these poncho dress up costumes.  These are perfect for toddlers and preschool age kids because they can take them on and off over the heads.

--------------------------------------
Supplies:
--------------------------------------
Minky or ultra cuddle fleece
Stuffing/batting
Pink fleece or felt
fabric scissors or rotary cutter

I really love how easy this pattern is to put together.  I didn't even hem the fleece edge around the bottom of the poncho.  You can if you want to, but it isn't really needed.   When you download the pattern and tutorial, I have the pieces for the ears and the measurements for the hood and an standard size poncho, but I also show you how to make it in other sizes.

I put some links below to the different types of fleece that work well for this poncho.  I've been trying to buy more fabric online because I can't trust myself at the darn fabric store.  I go in for 1 yard of something and come out with $100 in fabric I can't fit into my stash.  It's so bad I'm keeping some in my bedroom closet now because I've filled my studio.  #fabriccrazy


Click here for the free downloadable pattern.

This poncho made for hours of fun and it was such a hit I actually ended up making several different versions for her preschool classroom as a donation.  I took this patterns and also made a lamb, bear, and dinosaur.  The fleece makes it easy to wash and very sturdy.

Fat Quarter Carrot Treat Bag PDF Sewing Pattern Free

I made this pattern quite a while ago, but I still love it.  It's incredibly easy to put together and you can make 2 bags from 2 fat quarters.  It's one of my favorite patterns to throw together this time of the year.  I typically like to start my Easter Sewing early - though my daughter uses these treat bags in her lunch year round.  

Supply List:
------------------------------------
Orange Fat Quarter
Green Fat Quarter
Green Satin Ribbon
Fabric Scissors
Drawstring Puller

--------------------------------------
I placed the links to some great fats quarters and other supplies below.  I've recently started buying more on amazon because I cannot trust myself at the fabric store.  I always come home with a bunch of fabric I didn't intend to buy and I'm running out of storage space.  


I swear by the drawstring puller for threading elastic and ribbon.  I spent years pulling ribbon and elastic through with a big safety pin.  Never again.  The drawstring puller makes threading elastic ridiculously easy.  I also use to to constantly rethread my tweens hooded sweatshirts, but that's another story.

I would say these bags take about 20 minutes to sew 2.  I typically make a dozen or more when I sew them.  I'm thinking about making some this year with food safe nylon so they are easier to wipe out.  I filled them with sweet treats for Easter baskets and now my tween still uses them for snack bags in her lunch box.  Made with cotton they are great for goldfish crackers, cereal, and other dry snacks.  I think if you use nylon you can probably also fill with real carrots, apple slices, and more.

Click here to download the step-by-step photo tutorial and free printable pattern.

Check me out on instagram @indipatterns and be sure to tag me in your projects at #indisewingpatterns. 


Tuesday, March 7, 2017

Remaking my Diaper Cover Sewing Pattern

Since this month's theme is getting organized and setting goals, I'll share another one of my goals.  I want to remake/update most of my patterns.  For some that will only mean making new cover art samples.  But, for some of my older patterns I plan on fully remaking tutorials and pattern pieces.  I decided to start off with my baby patterns because I have a couple of babies and toddlers I can be sewing for right now.  It's part of my larger plan to "unify branding across all platforms".

So back when I first started, I had a very random name for my patterns.  After a while I realized that people thought it - was information technology.   When I first started making patterns there wasn't as much competition and the industry wasn't as sophisticated.  Here's my original cover.
 Then, about 4/5 years ago I decided to remake the cover with a more eclectic fabric mix.  I went with the white background.  It's actually really a pretty diaper cover.  But, there is nothing on the cover that brands it as mine.  I'm going to move my old pattern to my $.99 pattern category over in my craftsy shop.  It's still a great pattern and tutorial.  To purchase the Ruffled Diaper Cover Sewing Pattern click here.    
ruffle diaper cover sewing pattern
Also, my previous pattern was hand-drafted.  I actually don't mind hand drafted patterns.  I takes me back to the original way patterns were made and I often make things from ancient magazine articles where they gave you a sketch and some measurements.  
ruffle diaper cover sewing pattern
 But, I have gotten much more sophisticated in my pattern drafting and I really enjoy computer drafting my patterns now, especially for scalability.  Here is a sneak peak of the new computer drafted pattern.
diaper cover sewing pattern
Hopefully, I'll get the remade pattern in the shop this week.  I plan on adding my new logo to all my cover art and photos.  
sewing pattern logo

I'm also planning on eliminating the ruffle in the newest version.  I want to have something a bit more versatile for my favorite new thing, the cricut.  So, I'm making a plain pattern with the possibility of embroidering on the tush or using iron on vinyl from the cricut.    

If you want to check out a couple of other versions of the diaper cover, click here.  

I'll post the final product on the blog once it's complete.  Wish me luck.

Friday, March 3, 2017

Free Sewing Project Printable Planner Worksheet

In an effort to be more organized this year, I've been working on some planner pages for different projects.  I'm so tired of going to the store 2-3 times because I forget half the stuff on my list.  Also, making lists on my phone never seems to work out because the battery dies at the store and then I'm stuck trying to remember.  Free Sewing Project Printable Worksheet

Get the Free Sewing Project Printable Worksheet:  Download Here

What I love about this design is that it reminds me to look through my supplies and account for what I already have.  Right now I have about 15 packages of elastic because I just keep buying it every time I go to the store just in case.  

I'd love to see your completed planner pages and projects.  #indipatternsprojects


Sunday, February 12, 2017

Cricut Cut EVA Foam Armor Inset

Cutting out scale maille and armor pieces is so easy with the cricut.  I'm actually using my cricut cake because I loaned my personal cricut to my sis, but the machines work the same.  A couple of things to note:  Deep cut housing and blade.  This machine was originally made to cut paper, so to cut thicker stuff like eva foam sheet, I bought the deep cut house blade.  This lets you put thicker items through the cricut like foam, felt, cork, etc.  

I use a program called Sure Cuts a Lot (SCAL) because both of my machines are older and they don't work with the design space.  Anyway, it's also so much easy to use.  I really recommend it.  You can get version 2, which I use, for $8.00 on etsy.  I think you need the newest version for the newer machine, or just use design space.  
Next, I design the cut files in inkspace.  If you are just cutting something from clip art, you can actually import the jpeg right into SCAL.  I'll make another post on this.  These files are available on craftsy.  For the etched and cut armor, I use 2 separate files.  First I open the SVG for the diamond cut and I cut the scale maille (blade depth 6, pressure max, speed max).  This cuts the design.  The scale maille is still held together by a little bit, but they peel apart.     
Next, I import the etching pattern and line it up with the cutting pattern.  I change the blade depth to 4 so that the etching pattern doesn't cut all the way through.  

 Finally, I have this.  The scales are all etched and cut.  Normally I paint these while they are still in a sheet because I like spray paint and this keeps them from flying all over. 


Then, I peel them apart.  Here you can see a shingle style scale maille.  This style has no etching.  I cut about 50 scales in 5 minutes.  Plus, you can walk away from the machine while it cuts.  

 After I have the scales cut and painted and distressed/aged with black, I finish the edges with marker.  This is very quick and cleaner than paint.  The edges will barely be visible once you set these into the fabric.

I tack the scales down onto my stretch knit pants fabric with a tiny dot of hot glue.  I don't want to use much glue because I'm going to stitch this down.  I want movement.  Glue can make things stiff.  It's just to keep them in place.  

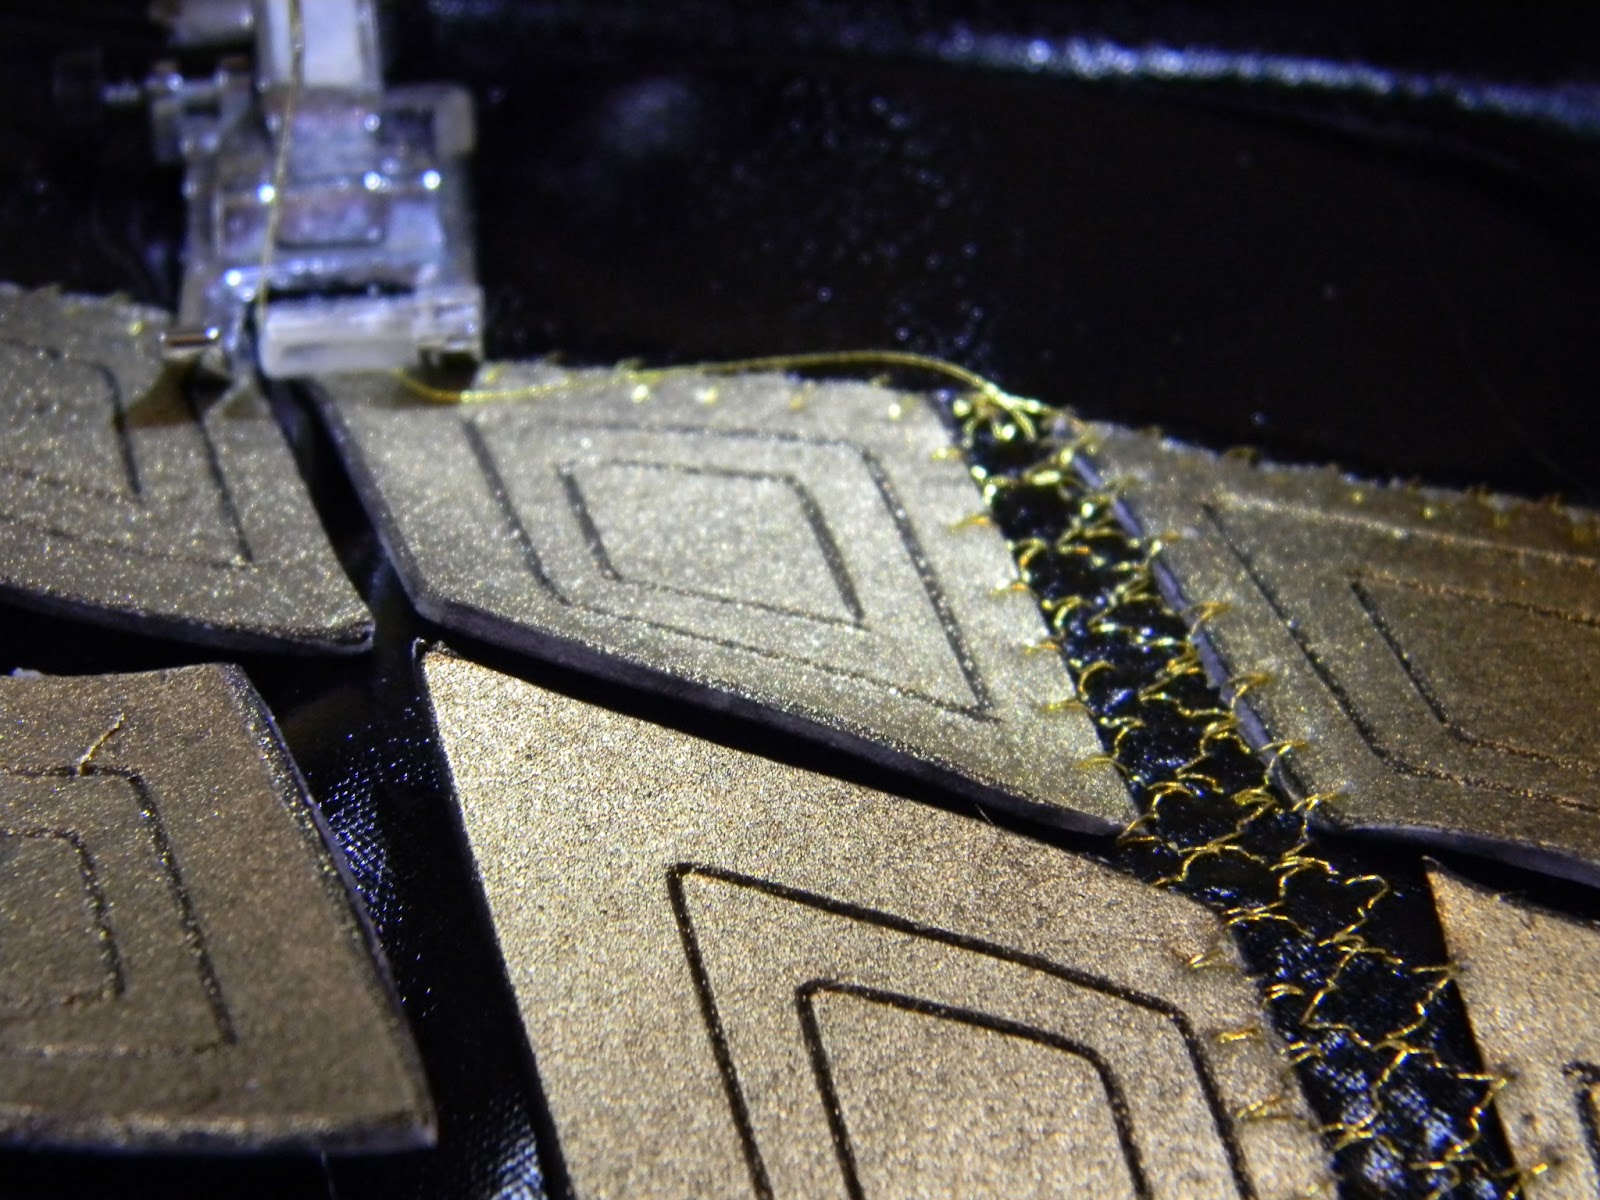
 Down I use a decorative stitch with metallic thread.  One hint, metallic thread is expensive.  I don't use it in the bobbin.  For gold, I put yellow thread in my bobbin and for silver I use grey in the bobbin.  For these pants, I actually just used the blind hem stitch on my machine because I like the way it looks.  See how I;m stitching half on the scale and half on the fabric.  I go around the outside of the while design and then work my way back through the rows.
Here you can see that I've completed one row and moved on to the next.  The stitches look like gold mesh.  

 Here I have finished all the rows.  I filled back in through the rows to make the "mesh" heavier.
 Here you can see the finished panel inset into the pants for Lady Loki.  These pants are skin tight, but this technique allows the pants to totally move.


Friday, November 25, 2016

Manly Sewing Projects

So I love making handmade gifts, but it isn't easy to sew stuff for the guys in my life.  I wanted to make something special for my dad and use my embroidery machine.  He's bringing my daughter on a really special fishing trip this summer, so I started thinking about making a fishing vest.  I happened upon fly fishing wallets and remembered my dad keeping flies in them when I was a kid, so I decided to make a couple myself.

These are often very expensive and made from leather and lamb's wool.  I wanted to use up some of my stash, so I just grabbed some brown faux fur left over from a costume and a heavy brown cotton.  The basic shape is 5"x11".


I embroidered the free trout design and the monogram (using the stitches on my machine) onto the fabric first.  So, I cut a much bigger piece of cotton than I needed.  I trimmed it down to size after embroidering the design so that I could have it centered the way I wanted.  You can just use printed fabric and skip the embroidery or hand-embroider if you don't have a machine.  I cut 1 piece wooly faux fur 5"x11" and 1 piece cotton 5"x11"


 Next, I pinned them together RIGHT SIDES together.
 In all honesty, I didn't even bother to pin it, but let's pretend I did.  Then, I stitched around the wallet with a 3/8" seam allowance, leaving a 2" opening in the bottom of the wallet to turn.  You can see that I also clipped off the corners.  This makes for a pointier corner when you turn the fabric because there is less bulk.  Before you stitch it up, you could add a little loop of para cord or ribbon to hold this onto a belt.  I didn't bother because my dad would never wear this on a belt.  He'll just shove it in his fishing vest pocket.


 I turned the wallet through the opening and pressed it.  Then, I top stitched the wallet.  This also closes the little opening you left to turn the wallet.

 Now you need to put on snaps or velcro.  I used velcro because it's cheap and I already had it in my studio.  I can't find my heavy snap setter anywhere, so I'm temporarily not using snaps.  They would look really nice on this project though.  I just cut velcro into 1" squares.
 Pin the velcro into the outer corners of the wallet.  Line up the other two pieces as shown in the photo so there is overlap when you close the wallet.  I pin them all in place.


Stitch down the velcro.  I use an X stitching to make sure it stays in place.  It got a little knotty here, but after a nice trimming, it will look just fine.  
The wallet folds up nicely and closes easily with the velcro.  It took about 10 minutes to sew these, excluding the embroidery.  


Working with Cork Fabric
So, I am not an expert in this - based on using it for one project.  However, I did a lot of research before buying it and watched quite a f...